
57. The large Bush Barrow Lozenge is a diamond or rhombus-shaped golden artefact. It has 36 triangles inscribed around its perimeter, which is significant because it equates to Stonehenge's internal diameter of 36 megalithic yards. Furthermore, the Lozenge's 100-degree angles are related to the moon, and its 80-degree angles respect the Stone Age 10-degree rule.
This nine-megalithic-inch-long artefact was found resting across the chest of the Bush Barrow man. His final resting place was a round barrow burial mound nestled south of Stonehenge. The Bush Barrow lies just inside the arc of the southernmost moonset from the centre of Stonehenge.
Someone on Wikipedia mistakenly claims its geometry is based on a hexagon.
The Bush Barrow man hoped to use the highly polished lozenge to activate Stonehenge by reflecting intense sunlight onto the internal faces of its sarsens and bluestones.

58. If we ever doubted that Stonehenge was based on a 36-megalithic yard circle, the large lozenge and the belt hook's geometry should dispel that idea.
The belt hook, seen in the centre of the image, is based on a 36 MI rhombus.
We know the size of the large lozenge and have used it to give an idea of scale. The white rectangle superimposed on the lozenge is nine megalithic inches long.
I know no other artefact that splits the megalithic inch into two parts, like the belt hook. However, I do recall that someone has suggested that the megalithic yard may have been divided into 80 parts, not 40.
This raises the question of whether someone discovered the geometry of the belt hook before me and has been "holding out."

59. Site IV is a henge with an array of 189 timber posts set at its middle and placed inside the greater Mount Pleasant Henge to the east of Dorchester in Dorset.
Excavated by Wainwright 1970-1971, the maths of Site IV suggests that something should grow.
Site IV was designed and built by Beaker Folk, who were crawling about all over the place in 2500 BC. The carefully placed posts in the middle of the site once again prove that the nine-megalithic-inch-long Bush Barrow lozenge - a rhombus - is geometric.
Perhaps more importantly, the 40-degree from the north Major Moon already obeys the 10-degree rule in Wiltshire, so in this respect, the lozenge is part geometric, part astronomical.
Site IV consists of three circles and two ovals. Oval Ring A is aligned with the northernmost moonset, while Oval Ring B is aligned with the summer solstice sunset. - So wrote Professor John North in his book "Stonehenge: Neolithic Man and the Cosmos."
The maths: The rhomboids increase geometrically in stages of 10 plus one.
The following diagram proves this array works equally well when the lozenge is rotated 90 degrees

60. The Bush Barrow lozenge turned through 90 degrees.
All rhombi shown above are accurate at 80 by 100 degrees. Sizes are...19, 27, 36, 46, and 57 Megalithic Yards. Therefore, they grow geometrically.

61. The 1.5 Megalithic Inch 60 by 120-degree Bush Barrow gold lozenge.
The first thing Beaker Folk did when setting out the post positions in the middle of Site IV was to determine the cardinal points north, south, east, and west. Next, they drew a rhombus of thirty-six Megalithic Yards in the vertical plane. This rhombus is shown in red.
The rhombi increase in arithmetical steps of 10 Megalithic Yards.

62. The Clandon Barrow Lozenge. This lozenge was found in the Clandon Barrow at the western end of Maiden Castle - an Iron Age fort west of Dorchester.
Dr Joan Taylor of Liverpool University measured this lozenge and found it to be 15.5 centimetres long. This converts to 7.5 Megalithic Inches. Archaeological lack of interest in proving the Megalithic Inch is quite apparent here! But don't blame the girl. She has to conform because she has a mortgage to pay.
Increasing steps...24, 24+12, 36+13, 49+14, 63+15 and 78.
The central area of this lozenge has a small rhombus in each of its four corners. Two of these increase fourfold, while the other pair rise five times, giving 18, thus representing the radius of Stonehenge's sarsen circle.

63. The Little Cressingham rectangle of gold was discovered in a round barrow burial near Norfolk's Grimes Graves flint mines.
Today, the rectangle is housed in Norwich Castle Museum. Despite unsuccessful enquiries to determine its size, it likely derives from a pair of back-to-back 3:4:5 Pythagorean triangles, which form a rectangle measuring three by four Megalithic inches.
My first scaling of this artefact originated from a photograph found in Andrew Lawson's book "Chalkland."
A second reference to its size appears in "Ancient British Barrows," published by the Antiquarian Society of London on page 528. Here, its size is quoted as 2.5 by 3.5 imperial inches (3.06 by 4.234 Megalithic inches). The pencil image of the rectangle provided in the report, along with its scale, is typically inaccurate.
In the context of Mount Pleasant, the rectangle starts at 150 times actual size. Mount Pleasant Site IV increases the rectangle in arithmetic steps of 6, 7, 8, and 9 MY.

64. An Irish Lunula of gold to be worn around a person's neck.
Lunula are often found in Cornwall and Wales. A Lunula similar to the one shown above came from LlanLlyfni Dolbenmaew Gwynedd, Wales, dating to 2000 BC.
One day in Ireland, many years ago, someone drew the moon on a sheet of pure gold. They started by hard-boiling an egg, believe it or not, which they carefully halved with a sharp piece of flint.
Next, they cast several radii from its profile to obtain the moon shape they wished to make.
They had made a thing of great beauty but remained unsatisfied; they wanted something more.
So they threw extra radii, not from around the shell but the yolk.
In so doing, they perfected this lunula and made a wish to tap into life, too.
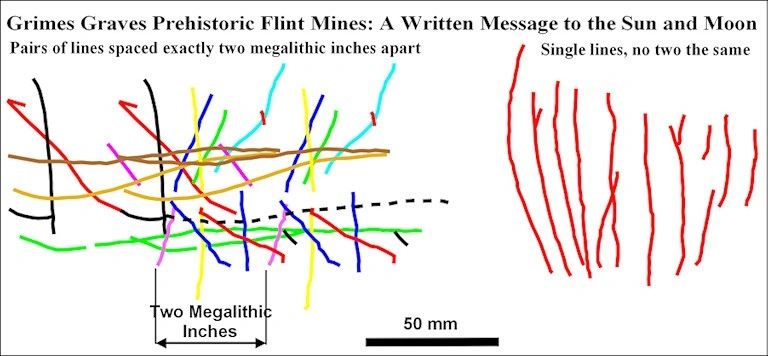
65. This artwork, found scribed on the side of Shaft 2 of Grimes Grave's flint mines, was lit by the sun at a specific time of day and conveyed the message that the sun and the moon should form a partnership.
Consisting of lines, no two of which are the same, the artwork on the right says do not remain single. The pairs on the left, spaced two megalithic inches apart, suggest marriage.
Turn this image through 90 degrees and make it the height of an A4 sheet, and it won't be far from the actual size!
At the bottom of another shaft, archaeologists found what they consider an Altar. This "Altar" suggests flight with the skull of a sea bird placed at its centre. A pair of deer antlers framing the skull of this bird appear to be kissing!

66. Antler's picks were the chief implements to hack away the chalk and release the flint. When blunt and reaching the end of their useful life, the majority were thrown in a heap to keep the floors clear for other antlers to make the patterns as seen above. These antlers were probably pristine and unused.
The black dots represent tiny heaps of charcoal that had been brought down from outside- no evidence of fire being found anywhere at the bottom of a shaft.
Carefully placed Red-Deer antler picks found on the gallery floors after removing every useful nodule of Floorstone flint provide us with further evidence of a Neolithic preoccupation with things that come in pairs - as shown in the images above.
Others were placed in threes to represent the family, as seen on the right.
From the out-of-print booklet "The real Grimes Graves prehistoric flint mines" ISBN 978-0-9553012-9-2, T W Flowers 2010.

67. Borrowston Rig. A geometric egg based on Professor Thom's survey as seen on Page 71 of "Megalithic sites in Britain 1967." Clarendon Press, Oxford.
One wonders how Professor Thom ever managed to find the value of the Megalithic Yard when he ignored the fundamental fact that stone circles were internal devices.
Here, we see how Thom incorrectly placed his geometry to pass through the centre of the stones. Not only that, but his scale is too small. - Fortunately, scale-wise, he unwittingly put things right by producing a 50 MY-diameter circle!
My blued-out version shows the correct geometry on which the stone circle of Borrowston Rig is based. Not only is the monument based on a pair of proportional to 3:4:5 Pythagorean triangles, but these triangles prove the Megalithic Inch as one-fortieth of a Megalithic Yard beyond doubt.
Furthermore, Stone Age folks were not as interested in perimeters as Thom seemed to think.
More corrected plans of Thom's are given on the sister site, Aveburydecoded, which you will be taken to later.

68. Whitesheet Hill.
This causewayed enclosure west of Stonehenge has an azimuth of 37 degrees and, pointing slightly further than the northernmost moonrise, aims into the "dark sky."
The round barrow breaks through the shell of this egg and suggests it to be contemporary with the enclosure.

69. SOLVING THE DORSET CURSUS... AND, by association, the Stonehenge Great Cursus.
Cutting to the chase, with no pun intended - The Dorset Cursus is a female entity with terminals aligned on the moon.
The Cursus is a six-mile-long ditched and banked track that once had a terminal at each end.
The Thickthorn Terminal, seen above, is at the southern end of the cursus. This terminal is the only one that has escaped the plough. This terminal is not set at 90 degrees to the cursus but is skewed to point at the northernmost rising moon -- otherwise known as the Major Standstill. This alignment also aims at the long barrow Handley I, the Wor Barrow.
The terminal at the northern end of the cursus is on Bokerley Down, its outline easy to see on hot, dry summers. From Bokerley, the southernmost moonset was seen through a notch in the landscape.
From these moon-aligned terminals, we can conclude that the whole cursus was devoted to the moon -- A moon entity.
The Thickthorn terminal is easy to find...
Leave Blandford Forum via the A345 to Salisbury and, after some six and a half miles, turn right at Thickthorn Cross and park up in the layby in Millers Lane – if there is a space for you to do so.
Then, exit the car in brightly coloured ridiculous clothes, or do as I did in 2017 and make yourself clown-like by sporting an umbrella on a bright summer's day! All this is to keep you safe, for Millers Lane is dead straight, there are no pavements, and cars drive up and down as if everyone is late for work.
Proceed up the hill on foot. Pass hedgerows threaded with barbed wire and continue until you reach a metal gate. Climb the gate and enter the field. You are now trespassing. I suppose you could have asked the farmer's permission, but that would let the cat out of the bag of what you are up to, and you might get told No!
Finally, walk to the bottom of the field, passing several round barrows, to arrive at the terminal.

70. An aerial view, courtesy of Bing Images 2017.
The Thickthorn terminal is the only terminal left standing. But, sadly, as I write this, I have to report that this one remaining terminal, having survived the hand of man for over 5,000 years, was violated by the plough in 2018. And perhaps, by now, it is already levelled.

71. Photo looking northeast from the Thickthorn Down terminal.
Here, the cursus crosses Gussage Valley on its way to the top of Gussage Down, incorporating the famous long barrow known as Gussage St Michael III. Unfortunately, we cannot walk the cursus from the Thickthorn Down terminal because a thorny hedge bars the way, so this photo was taken through a small gap. However, we can see how the cursus goes one way, and the terminal points another - That's because the Thickthorn terminal is trained on where the northernmost moon rises out of the massive Wor barrow (Handley 1).
The Wor barrow was wholly excavated in 1894 by General Pitt Rivers. It consisted of a primary and a secondary mound. The primary mound held six male skeletons. The secondary mound was built using chalk from an outer ditch. Found In the ditch were the skeletons of a man and boy. The man had been shot. Note how this moon-aligned barrow held just men.
From a recommended book...A Landscape Revealed. 10,000 Years on a Chalkland Farm by Martin Green. "Remarkably, Pitt Rivers, the excavator, also found a crouched Beaker burial southeast of this barrow." I would ask: What was so remarkable about it... an early date, perhaps?
Let's take a virtual walk along the cursus to stand alongside the Gussage St Michael III long barrow sitting on the crest of Gussage Down.

72. Looking northeast from Gussage St Michael III long barrow to Wyke Down.
Here, the cursus crosses the Allan Valley, where several monuments could once be seen on both sides of the cursus. Unfortunately, most are only visible today from the air. We also note that the cursus passes through a small pond, hence water.
Here, we can see that another terminal crosses the cursus. This terminal is known as Bottlebush Down, or sometimes Wyke Down. We will walk to this terminal and turn about to see why it falls short of the top of the ridge and what the Dorset Cursus is most famous for.

73. The winter solstice sun enters the long barrow of Gussage St Michael III when viewed from the terminal on Wyke Down. Professor John North said Sirius also entered the barrow in 3,450 BC. Neolithic man and the cosmos, Professor John North.
We also note that the Wyke terminal is not on the highest point of Wyke Down. Any higher and the long barrow would not shape the skyline but some distant landmass.

74. A view south from the Bokerley Down Terminal at the northern end of the Dorset Cursus.
Again, we see how this terminal points one way, and the cursus goes another. The cursus is only a connector.
This view might not look like much, but a study of the landscape suggests that Gussage St Michael III would be visible and in line with the southernmost moonset were it not for the trees of the Salisbury Plantation.
The high ridges and valleys that run from northwest to southeast across Cranborne Chase owe their great beauty to torrents of glacial meltwater that smoothed the Dorset chalkland many thousands of years ago.
One incredibly long and level ridge took people's eye on the Downs some six thousand years ago because the southernmost sunset sank into it. That ridge is known as Gussage Down, and people had watched the sun disappear into it year after year while sitting a little below the top of the Bottlebush Down ridge, almost two miles north of Gussage Down.
From around 4,000 BC, generation after generation had sat and watched the sun sink into Gussage Down and noticed something else. The brightest star, Sirius, sometimes came down in the same place.
This occurred around 3,500 BC and lasted for a couple of hundred years. People marked this position with braziers that could be seen from the distant Bokerley Down. The obvious thing to do was capture the sun, moon, and star inside the long barrow of Gussage St Michael III. Then, connect the terminals and barrows with a six-mile-long avenue scratched into the chalk.

75. The Dorset Cursus is a love nest for the sun and moon.
Suppose you had been fortunate enough to find yourself standing at the Wyke Down terminal 5,450 years ago in the middle of December. In that case, you might have seen the Sun and Sirius as they disappeared into the long barrow known as Gussage St Michael III.
If you then kept watch at the Bokerley Down terminal for many years, you might have seen the moon as she entered Gussage St Michael while adjusting her dress, combing her hair, and applying lipstick.
Then, keeping watch at the Thickthorn Down terminal, again for many years, you would have hoped to see the moon as she left the Wor barrow with child -- a baby sun.
This was when the moon reached her most northerly point of rising. All this can still be seen today, of course. But where was her baby to have been born?
Presumably, and given her rising, the moon carried this child aloft to join existing heavenly bodies.
Bibliography: The Dorset Cursus Complex: A Neolithic Astronomical Observatory? Penny. A. Journal - Royal Archaeological Institute 130 1973.