
114. Some wonder if Stonehenge was ever finished and made complete. But does it matter if the intent was there? If it were finished, the outer circle (Sarsen Circle) would have had 30 equally spaced standing stones, called megaliths, evenly spaced around a 36 Megalithic Yard diameter circle, even though the rugged sarsens that people supposedly hauled from the downs near Avebury and stood upright at Stonehenge never came in handy-sized sections as seen above.
Nonetheless, the plan was to erect the megaliths twelve degrees apart, leaving gaps of four degrees between them. And we know those early folks had accurately divided the compass into 360-degree parts, as was found scribed on pottery in Devon and Dorset.
Megaliths 26 and 11 marked the cardinal points north and south with their leading and trailing edges, and this ensured that Stonehenge’s primary axis would have an azimuth of 50 degrees. Furthermore, since the prehistoric solstice was less than 49 degrees clockwise from the north, Stonehenge’s 50-degree axis is not precisely aimed at the solstice as many like to think.
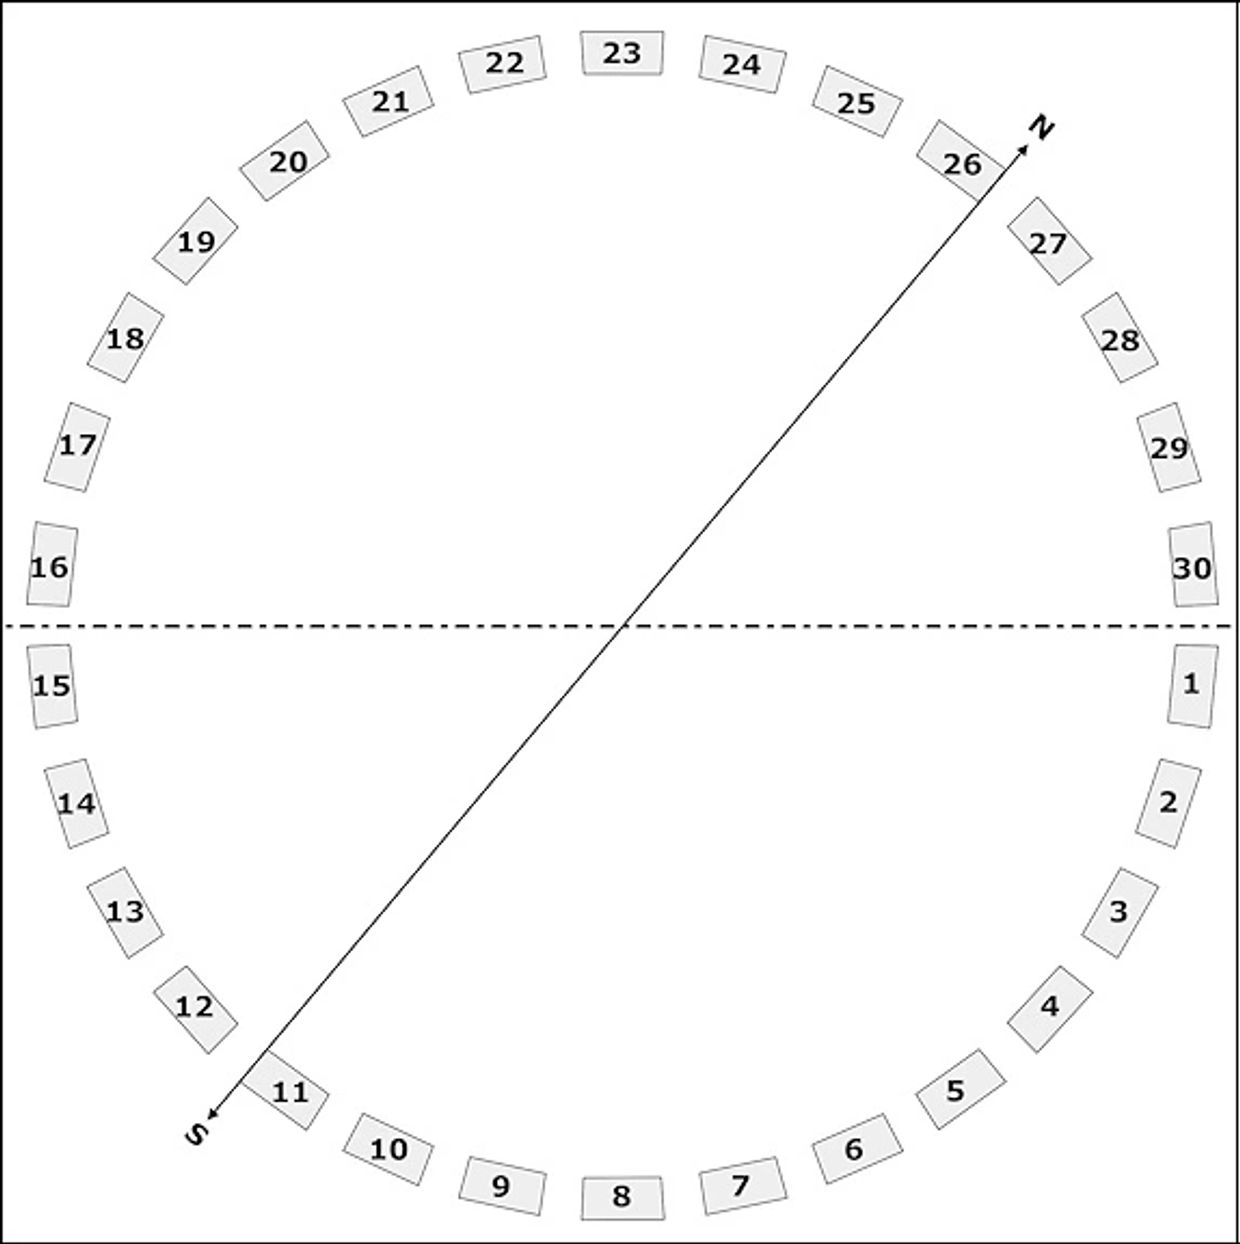
115. To help resolve Stonehenge’s geometry, we start by rotating the circle forty degrees clockwise so that its axis becomes horizontal.
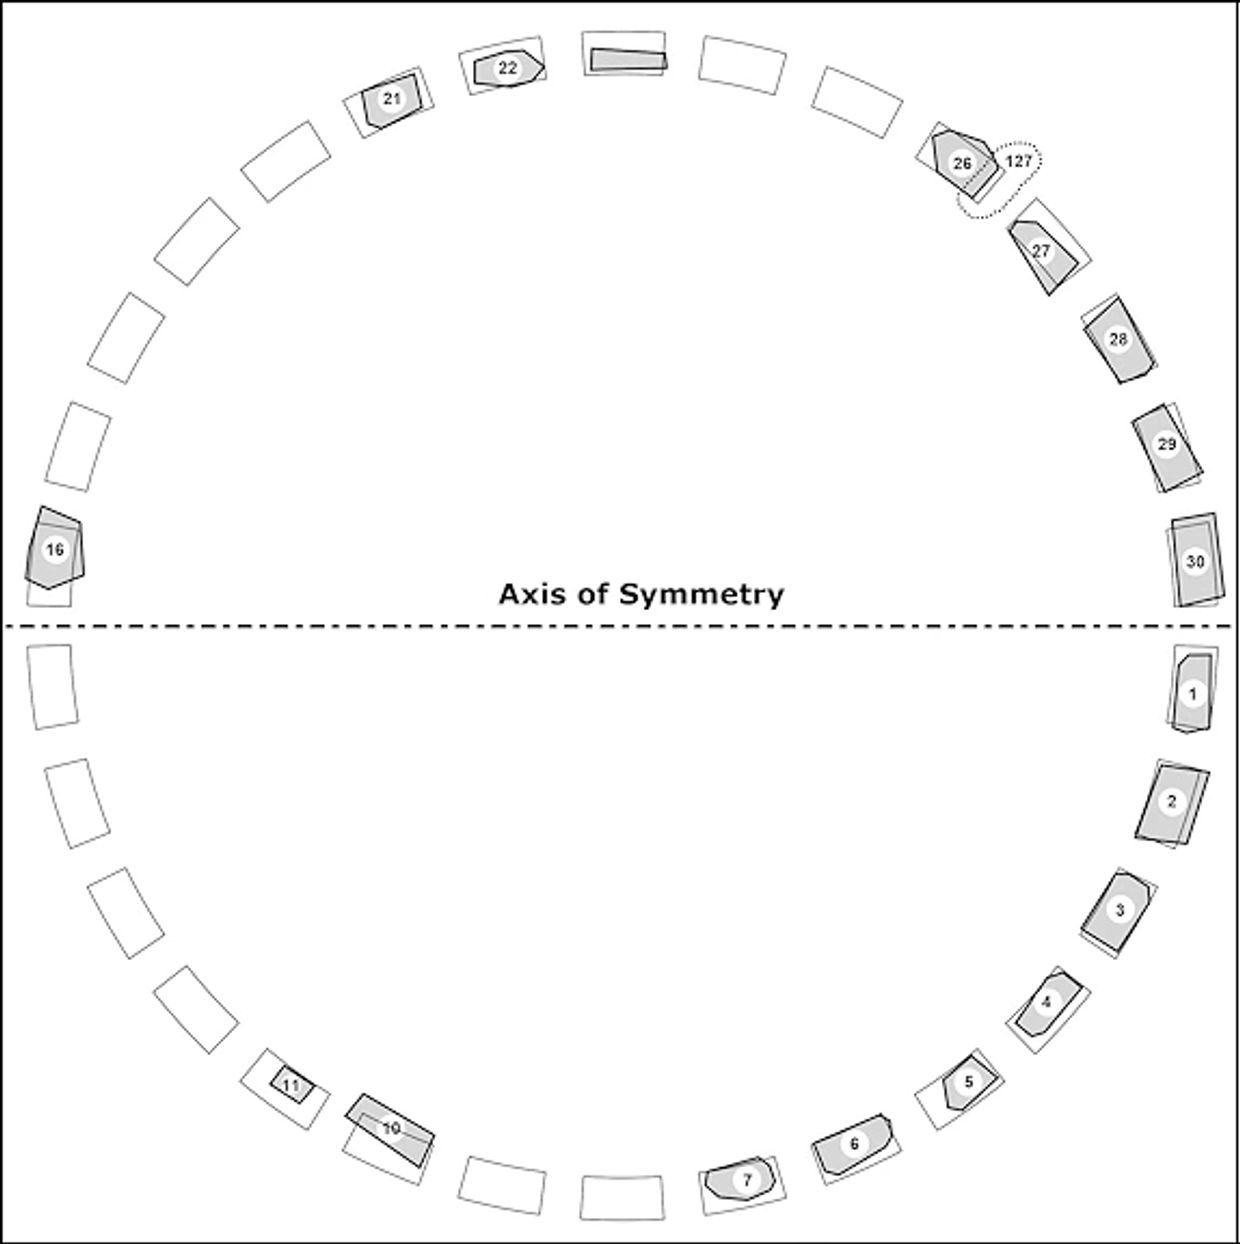
116. Next, we add those sarsens whose positions John Wood and Sir Flinders Petrie had determined many years ago.
John Wood surveyed Stonehenge in 1740, or a little before, and his ground-plan view of the remains of the Sarsen Circle is shown above. However, Stone 26 was a particular case, with only its stub remaining. John regarded this stone as overthrown. He also surveyed its nemesis, Lintel 127, that destroyed it, as did Flinders Petrie in 1880.

117. To prove the circle’s geometry and measurement, we print the above image on a pair of A4 transparencies after colouring those stones above the centreline a light grey and those below a darker shade.

118. This image results from inverting one transparency and placing it over the other. We now find that Stone 10 is misplaced. Ignoring Stone 10 gives the Sarsen Circle a perfect 36 Megalithic Yard diameter and provides a sensible scale our images.
Most importantly, we have accurately resolved Stonehenge's true centre and determined the position of its Major Axis, which passes through it.

119. The Outer Oval of Welsh Bluestones. Formally considered to be circular.
Bluestones standing in 1740 after John Wood had surveyed Stonehenge are shown entirely black, and Petrie’s positions, as he found them in 1880, are grey and doted, albeit hidden mainly beneath John Woods.
Petrie drew a faint line against some of them to indicate their degree of lean. The longer the line, the greater the amount. We mark two of these bluestones with arrows.
Take note of the intriguing male and female type stones that span Stonehenge’s entrance, often referred to as the 'Doorway' due to the presence of a lintel.

120. Once again, we print a pair of transparencies and place one over the other. The above image is the result.

121. We now find that this arrangement of bluestones describes an oval comprised of two 27-diameter circles whose centres are separated by two Megalithic Yards. Furthermore, the axis of this oval is offset from the centre of the Sarsen Circle by 24 Megalithic Inches (1.63 ft). And as we shall see, this offset is because Stonehenge is designed around a tiny 3:4:5 Pythagorean triangle.
This reminds us of the proverb, “Great oaks from little acorns grow.”

122. Stonehenge's oval of bluestones is dedicated to the Moon.
This image of the outer bluestone oval includes the fallen bluestones from Petrie’s survey and will showcase the meticulous alignment of Stonehenge with the moon's movements.
When the image is returned to respect the north, the axis of this oval will point at the southernmost moonrise and northernmost moonset at major standstills. It's fascinating to note that the moon, at its southernmost Lunar standstill, appears to ascend a hill, a testament to the intricate design of Stonehenge. It could also be one further reason why Stonehenge is where it is.
The Oval’s size, 27+29, equals 56 and shows respect to the 56-year moon cycle, as do Stonehenge's 56 Aubrey Holes!
Text revised 23/04/2024

123. Stonehenge’s Trilithon Cove.
John Wood’s sarsen megaliths are shaded in grey. Those Flinders Petrie surveyed in 1880 are shown dotted. However, because Trilithon 4 fell to the ground some 50 years after Wood’s survey, Petrie had to rely on John Wood’s survey for megaliths 57 and 58.
Again, note that Petrie placed an arrow highlighting Stone 56’s significant lean towards Stonehenge’s centre.

124. Fortunately, we have a better idea of Stone 56's position in prehistory thanks to Professor Gowland, who restored and set it in concrete in 1901. The preferred position of Stone 56, as corrected by Gowland, is now shown above.
Similar to what we did before, the above image was printed on two transparencies, and the top sheet was inverted to show that some trilithons are not true to the Major Axis but are placed asymmetrically.

125. Folding a single transparency is often just as good as any other method. And this is the result. Either method exposes an excessive gap through Trilithon 3, which we know should only be 12 imperial inches (0.37 MY). Thus, it proves that the Great Trilithon is on a separate axis.
Trilithon 4 is also on this separate axis.
126.
This is another way of proving the eccentricity of Trilithons 3 and 4 and Stonehenge’s need for a second axis. We temporarily superimpose a circle and rectangle true to the Primary axis to see if all trilithons concur. We have also added the fractured and recumbent trilithon Stone 55 in the place where John Wood found it.
First, we notice that including Stone 55 reduces the gap through the Great Trilithon and that the Primary axis does not pass through this gap. Also, Stones 57 and 58 fail to touch the circular imposition by 0.82 MY (2.2 ft) and 0.63 MY (1.7 ft), respectively, whereas the opposing stones 53 and 54 are hard against it.
Conversely, the rectangle proves Trilithons 1 and 5 are symmetrical to the Primary axis.
Note the similarity to Scotland’s heel-shaped cairns and the 9000-year-old Mesolithic cove beneath the sea just off the coast of Israel that opens out to the solstice.

127. Stonehenge’s tiny Pythagorean triangle around which its circles and ovals are cast.

128. Stonehenge's Inner Oval Of Bluestones Dedicated To High Altitude Solstice Sunlight.
An oval of perhaps 24 Welsh bluestones, shaped and polished, once graced the centre of Stonehenge. Unfortunately, several of its stones in the northeast (to the right in this picture) were broken up and taken away years ago, and this caused the oval to be described as a horseshoe. That is how John Wood found it when he surveyed Stonehenge. The result can be seen above with the remaining bluestones coloured grey.
Flinders Petrie measured the width of the “Horseshoe” in 1880 and found it to be 473 inches. (14.481 MY). Atkinson found it to be 39 feet six inches - 474 inches (14.511 MY). Clearly, the Stonehengers set it at14.5 megalithic yards.
Post holes of the missing bluestones have since been discovered by the archaeological excavations conducted by Hawley and Atkinson. These excavations have shown it to be an oval with a central axis half that of the Sarsen circle at 18 Megalithic Yards long. However, the Oval is placed on Stonehenge’s Secondary Axis, as was the inhumation found by Hawley. Strange do you not think that Stonehenge appears to be dedicated to an inhumation while the Aubrey Hole held cremations?
Taking every opportunity to suggest growth, the Oval may also be regarded as based on four near-Pythagorean triangles.
**
The 50-degree alignment of Stonehenge’s Primary axis was determined 500 years before the Sarsen Circle was built by squeezing sunlight between upright timber posts placed more than 280 feet apart. These timber posts stood in Aubrey Holes 56 and 28. So we know that the Stonehengers regarded incoming sunlight as a narrow beam - like a LASER - and shifting the Great Trilithon onto the Secondary axis allowed Stone 55 to block Primary Axis sunlight and prevent it from escaping. The exceptionally wide bluestone 67 was placed between the axes for the same purpose.
This author first published the suggestion that Stonehenge acted like a Laser in the book “Stonehenge Secrets 2007, ISBN 978-0-9553012-1-6.”

129. Putting it all together and turning Stonehenge’s geometry to respect the North.
1. Starting with an outer circle of 36 megalithic yards and working inwards…
2. A bluestone oval, previously regarded as a circle, is aligned with the moon and respects the 56 Aubrey Holes by measuring 27 by 29 Megalithic Yards.
3. This is followed by a trilithon cove set partly on one axis and partly on another to block incoming high-altitude sunlight on the summer solstice morning.
4. A smaller bluestone oval, incorrectly described as a horseshoe, measures 14.5 by 18 MY and is placed on the secondary axis. 14.5 times two plus 30 is two monthlies of the moon and the human female. Also, the length of this oval is half the diameter of the Sarsen Circle.
Furthermore, this oval is based on four near-Pythagorean triangles measuring 3.5 by 7.25 by eight megalithic yards. So here, in the minds of prehistoric folks, is further proof of growth!
5. At the centre of the geometry is a tiny 18:24:30 megalithic inch Pythagorean triangle upon which Stonehenge's geometry is based. Like barley seeds placed in soil, Stonehenge's little triangle represents the germ from which the Stonehengers believed something might grow.
6. A six-megalithic-yard-long Altar Stone measuring one-sixth of the Sarsen Circle completes the ensemble.
Petrie measured the Altar Stone and found its length to be 198 imperial inches. This converts to a meaningful six megalithic yards.
REF: “STONEHENGE: PLANS, DESCRIPTION, AND THEORIES.” BY W. M. FLINDERS PETRIE.
130. Stonehenge's geometry is seen superimposed on John Woods’s 1740 survey.
Stone 80 - the Altar Stone - is shown in green. Petrie's Stone 80 is marked with dotted lines. The Altar Stone, at six megalithic yards long, is one-sixth of the Outer Circle’s diameter, proving that it never did stand upright. Note two post holes in front of it that appear to fix its position. I believe it was placed lying flat on the ground.
The skewed attitude of Stone 80 may be deliberate; if so, it was meant to reflect sunlight onto the male-type Stone 49 placed just inside the entrance of the sarsen circle. This would prove Stonehenge of the male gender. Well, we knew that, anyway!
131. The axis of the bluestone oval is aligned on the southernmost moonrise in one direction and the northernmost moonset in the opposite direction a few days later.
Unfortunately, these alignments are restricted by Stones 8 and 23.

132. Stonehenge's Station stone triangle confirmed by predictive hypothesis. It is not a rectangle.
Beaker folk believed that geometry was a form of language they hoped could be deciphered by the sun and moon.
A small triangle at its core, surrounded by something much larger, implied that Stonehenge was meant to grow much bigger. We are talking about Britain's farmers, after all.
In terms of volume, the large triangle is 1920 times bigger.
The Station Stone triangle seems to be centred on the secondary axis, similar to the "Bluestone Oval".
Neither the Aubrey holes nor the Station Stones have been thoroughly surveyed. Archaeologists are not keen to do so.

133. Mount Pleasant, Dorset.
There is no better way to finish than to prove that Stonehenge is based on a tiny 3:4:5 megalithic inch triangle. The same-sized triangle as those seen above.
The five circles of Site IV in the middle of the massive henge to the east of Dorchester were accurately excavated by Wainwright in 1970-71. The innermost rings, Rings D and E (E not shown here due to lack of space), have egg shapes based on the same Pythagorean triangle as Stonehenge. Ring D and E aim a little south of the southernmost moonrise.
It's interesting to note that, adding to the complexity of Stone Age astronomical alignments, the Bush Barrow, with its precious gold artefacts, is aligned a little south of the southernmost moonset!
BIBLIOGRAPHY: Reports of the Research Committee of the Society of Antiquaries of London. No. XXXVII
Mount Pleasant, Dorset; Excavations 1970-1971, incorporating an account of excavations undertaken at Woodhenge in 1970.
By G. J. Wainwright with major contributions by D. Britton, R. Burleigh, J. G. Evans, R. A. Harcourt and I. H. Longworth. 1979.
Please click the link above for AveburyDecoded.com. If your antivirus prevents the link from working, close this site and open it afresh in your browser.